General
The General settings let you set up and configure the LiveFlow capture.
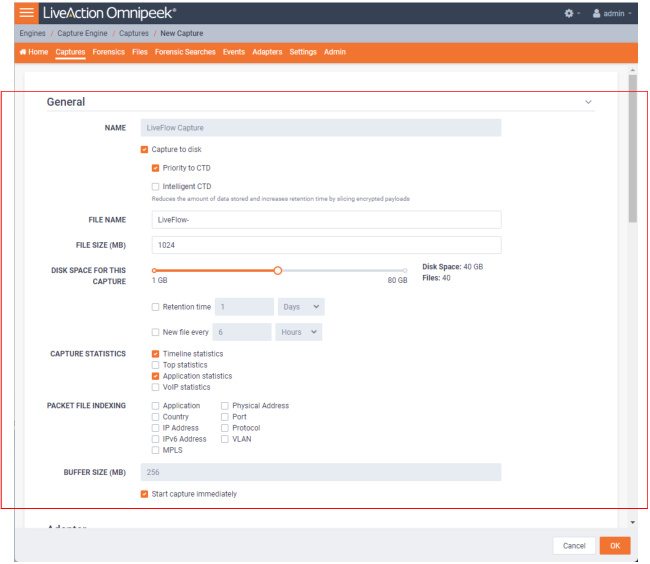
• Name: Type a descriptive name for the capture. Unique names can help you to identify and organize your captures.
• Capture to disk: Select this option to save packet files on your disk. Packet files saved to your hard disk (and the individual packets/packet decodes in each of the files) can be opened and analyzed at a later time with Omnipeek. If you are more interested in speeding up analysis of the data and conserving hard disk space, you may want to disable Capture to disk.
• Priority to CTD: Select this option so that real-time analysis doesn't impact the capture-to-disk (CTD) performance. When this option is enabled, it is less likely that packets are dropped when they are captured to disk. If capturing all the packets to disk is desirable, enable Priority to CTD. If analysis is more important, disable Priority to CTD.
• Intelligent CTD: Select this option to reduce the amount of data stored to disk and increase your retention time by intelligently slicing off encrypted payloads. It does this by tracking flows—if a flow is encrypted, the full data for the first 20 packets is kept and the payload from the rest of the packets is sliced. It keeps the first 20 without slicing so the certificate exchange is always included.
Intelligent CTD is an advanced feature that provides significant benefits to network security and data retention. It reduces the amount of data stored on disk and increases retention time by intelligently slicing off encrypted payloads, which helps to conserve storage space and improve system performance.
The way Intelligent CTD works is by tracking flows on the network. When a flow is detected as encrypted, Intelligent CTD keeps the full data for the first 20 packets and slices the payload from the rest of the packets. This ensures that the certificate exchange is always included in the data, which is critical for identifying encrypted traffic and providing context for analysis.
The benefits of Intelligent CTD are numerous. Firstly, it helps to optimize storage usage, as the system doesn't store unnecessary data. This helps to reduce the cost of storage and improve system performance by reducing the amount of data that needs to be processed.
Secondly, Intelligent CTD helps to improve retention time. By conserving storage space, it enables organizations to retain data for longer periods, which can be critical for compliance and regulatory requirements. This also enables organizations to perform more in-depth analysis of data, which can provide valuable insights into network activity and help to identify potential threats.
Thirdly, Intelligent CTD helps to maintain privacy and compliance. By keeping the certificate exchange in the data, it ensures that the system can identify encrypted traffic and provide context for analysis, without compromising the privacy of users. This helps organizations to comply with privacy regulations and maintain the trust of their users.
Overall, Intelligent CTD is a powerful feature that provides numerous benefits to network security and data retention. By intelligently slicing off encrypted payloads, it helps to optimize storage usage, improve retention time, and maintain privacy and compliance.
• File Name: Type the name used as a base file name prefix for each capture file that is created using the Capture to disk option. Additionally, each capture file is appended with a timestamp indicating the date and time the file was saved. The format of the timestamp is YYYY-MM-DD-HH.MM.SS.mmm.
• File Size (MB): Enter or select the maximum file size before a new file is created.
• Disk Space For This Capture: Move the slider control to set the amount of hard disk space allocated for the capture. The minimum value of the slider is the minimum size of disk space a capture can occupy.
• Retention time: Select this option to configure how long CTD files can remain on disk. You will need to configure the amount of minutes, hours, or days. For example, if you specify 3 days as the retention time, you'll only see the CTD files written within the past 3 days regardless of how much disk space you reserve for the capture.
• New file every: Select this option to create a new CTD file at a specific time interval rather than when the CTD file size specified is reached. You will need to configure the amount of minutes, hours, or days. For example, if you specify that you want a new file every 1 minute with a 4 GB CTD file size, there will be a new CTD file every 1 minute even if the CTD file is only 1 GB in size. If the 4 GB size limit is reached before the 1 minute mark, then the New file every option doesn't come into effect.
• Capture Statistics: Select the type of statistics desired for the capture:
• Timeline Statistics: Select this option to populate the capture engine database with capture data and basic network statistics such as utilization, size, distribution, etc. These statistics are then made available through the Capture Engine Forensics tab.
• Top Statistics: Select this option to populate the capture engine database with top nodes and top protocols statistics. These statistics are then made available through the Capture Engine Forensics tab.
• Application Statistics: Select this option to populate the capture engine database with applications statistics which are made available through the various ‘application’ displays.
• VoIP Statistics: Select this option to populate the capture engine database with VoIP call quality and call volume statistics. These statistics are then made available through the Capture Engine Forensics tab.
NOTE: Selecting the VoIP Statistics option may affect capture performance, especially when there are more than 2000 simultaneous calls on the network. Selecting the Top Statistics option may affect capture performance, especially when there are more than 10,000 active nodes captured on the network.
• Packet File Indexing: Under certain conditions, Packet File Indexing increases performance for forensic searches that use software filters. Overall capture-to-disk performance can degrade slightly, but forensic search results may be returned significantly faster if the packet elements being filtered are contained in the index and the packet characteristic is sparsely located within the packet files being searched. Enable the packet characteristics below you are most likely to use in a forensic search software filter.
• Application
• Country
• IP Address
• IPv6 Address
• MPLS
• Physical Address
• Port
• Protocol
• VLAN
• Buffer Size (MB): Enter a buffer size, in megabytes, for the amount of memory dedicated for the capture buffer. The capture buffer is where packets are placed for analysis. The default is 256 megabytes. A larger buffer can reduce or eliminate packet loss due to spikes in traffic. When Capture to disk is enabled, the Buffer Size option is unavailable.
• Start Capture Immediately: Select this option to immediately begin capturing packets once you click .